Continue reading to learn how to fix Dolby Atmos not working in Windows 11 and 10.
Dolby Atmos is an innovative spatial audio system that elevates sound to an entirely new level. Dolby Atmos music is an immersive musical experience that provides your music with enhanced clarity, depth, and space. Instead of simply hearing your music, Dolby transports you inside the song. This technology enables users to comprehend how music is made and experienced. In addition, this technology lets you hear precision, fantastic detail, and realism in the sound surrounding movies, TV shows, and video games.
It implies that Dolby Atmos improves sound quality and provides a cinematic experience of the highest caliber. It is only possible, however, if Dolby Atmos works as planned on your Windows operating system. Unfortunately, Dolby Atmos is frequently rendered inoperable due to obsolete or faulty sound drivers. Therefore, it is always recommended to keep sound drivers up-to-date to avoid such situations. In addition to broken or corrupted sound drivers, the problem is caused by outdated Windows versions, misconfigured settings, disabled exclusive mode, and the Dolby Atmos access app itself.
However, you need not be anxious about that because I will explain alternative solutions in this article to help you to resolve the Dolby Atmos Not Working on Windows 10 issue.
[lwptoc]Quick Ways to Fix Dolby Atmos Not Working in Windows 11/10
The following are the most workable tactics to resolve Dolby Atmos not working in Windows 10 and 11.
Solution 1: Perform Audio Troubleshooter
Windows operating systems have a variety of troubleshooters meant to handle common issues, such as Dolby Atmos not working on Windows 11. For example, if you encounter problems with Dolby Atmos, the Windows audio troubleshooter can help you resolve the issue. Here is how to proceed:
Run Audio Troubleshooter on Windows 10:
- Using Windows & I keys combination, open Windows Settings.
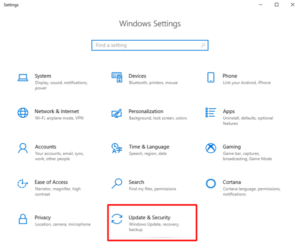
- Click on Update & Security.
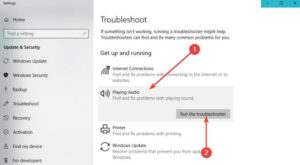
- On the left, select Troubleshooter. Afterward, scroll down until you see Additional Troubleshooters. Once found, tap on the very same.
- Next, choose Playing Audio and click on Run the troubleshooter. Check the image below for reference.
- At Last, follow the simple instructions on your screen and let the Windows troubleshooter detect and resolve the Windows 11 Dolby Atmos Not Working problem.
When everything is done, reboot your computer to test the issue. Then, proceed to the next solution if you need something else.
Run Audio Troubleshooter on Windows 11:
- Hit Windows and I keys together from your keyboard to invoke the Windows Settings menu.
- Choose System from the left menu pane. Afterward, on the right, scroll down to find and select Troubleshoot.
- Next, select Other troubleshooters.
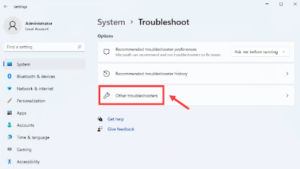
- Locate Playing Audio and tap on the Run button adjacent to it.
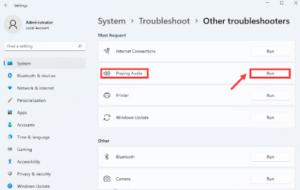
After that, follow the on-screen directions and let the troubleshooter identify and resolve any issues. And if Dolby Atmos still doesn’t work as planned, try the following fix.
Solution 2: Install Latest System Updates
In these older system updates, Dolby Atmos spatial audio is not introduced. Therefore, you will need to install the most recent version of Windows OS to use it correctly. Additionally, system updates typically include bug fixes, performance enhancements, and extra new features for your computer. It is how to proceed:
- Open Windows Settings and tap on Update & Security to proceed.

- Next, must ensure that Windows Update is selected from the left pane.
- Tap on the Check for Updates button.
Be patient as Windows searches for system updates. If the prompt says, “You are up to date, jump to the next fix. If the prompt indicates that updates are available, click Install Now and wait for Windows to install the updates on your computer.
Solution 3: Update your Outdated Sound Driver
Dolby Atmos not working is primarily attributable to corrupted, broken, or obsolete sound drivers. In this instance, you must determine whether your sound drivers have been upgraded to the most recent version.
Manually or automatically, you can upgrade obsolete audio drivers. You can use the Windows Device Manager tool to perform audio driver download and update operations manually. If Windows cannot locate the most recent and compatible drivers, visit the manufacturer’s official website, search for the relevant driver file, and follow the on-screen directions to install the most recent drivers on your computer.
If manually updating device drivers sounds too time-consuming and challenging, you can use a third-party service such as Bit Driver Updater. It is an intelligent and convenient software that automatically detects your device, locates, downloads, and installs the most authentic drivers. Performing driver updates is as simple as two mouse clicks using Bit Driver Updater.
Here is how to update outdated audio drivers through Bit Driver Updater:
- Download Bit Driver Updater’s installation file from its official website. You can even do it without cost by using the download link below.
- Double-tap the downloaded file and follow the on-screen instructions to complete the installation.
- After installation is complete, run the driver updater app on your computer. Then, select Scan from the menu on the left.
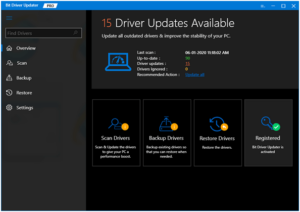
- Wait while the software scans your device for outdated or incorrect drivers. Then, click the Update Now button next to the driver you wish to update after you are finished. Additionally, you may click the Update All button. It allows you to update many drivers at once.

However, it would help if you upgraded to Bit Driver Updater Pro to use the one-click driver update functionality. With the pro edition, you get access to additional features such as an integrated backup and restore tool, a scan scheduler, 24/7 technical support, a system optimizer, and a money-back guarantee, but only for a limited time.
After installing the most recent driver updates, you will need to restart your computer for the changes to take effect. Then, test the issue by attempting to access Dolby Atmos. If it remains unchanged, proceed to the next strategy.
Solution 4: Turn On Exclusive Mode
Exclusive Mode is a built-in Windows feature that fully controls an audio device’s drivers. It is often enabled by default. However, if it is mistakenly removed, you may encounter audio issues such as Dolby Atmos not working Windows 11 reddit. Therefore, to resolve the issue, you must do the following actions to activate the Exclusive Mode feature:
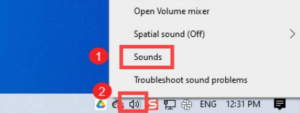
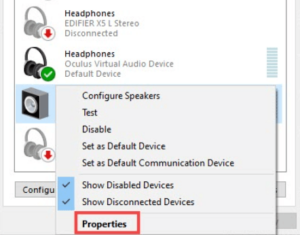
- In the System Tray, tap right on the Speaker icon and choose Sounds from the available options.
- Switch to the Playback tab and right-tap on your speaker.
- Choose Properties.
- Now, the Speakers Properties window appears; select the Spatial sound. Next, tap the drop-down button and choose Dolby Atmos for Headphones.

- Tap on OK to apply the new changes.
- Now, select the Advanced tab. Next, scroll down to the Exclusive Mode section and tick all the checkboxes. Then, tap on OK to validate the recent changes.
Now, try to play some content to check whether the Dolby Atmos is working correctly or not. Try another method if this doesn’t help.
Solution 5: Create a System Restore Point
If this issue arose recently, it was likely triggered by a modification that your computer underwent recently that you cannot identify. If that’s the case, you can resolve the issue by restoring your system to a previous version that was functioning normally. Follow the procedures below to restore the system:
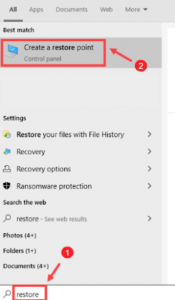
- Go to the search bar on the taskbar and input restore. Then, tap on Create a restore point from the list of searched results.
- Please navigate to the Configure… button and make tap on it.
- In the next pop-up window, find and select the Turn on System Protection option.
- Tap on OK to proceed.
- Afterward, choose your preferred System driver and tap Create… button.
- Type a report for your restore point that you can identify. Then, tap on Create.
- You will be prompted with the following (The restore point was created successfully) message. Tap Close to finish the process.
When done, check to see if your problem has been fixed. If Dolby Atmos Windows 11 not working persists, move on to the last resort.
Solution 6: Reinstall Dolby Access
None of the other solutions worked? As a last resort, please consider uninstalling and reinstalling Dolby Access. Dolby Access is a software tool that allows you to configure Dolby Atmos on Windows operating systems and other devices. Nevertheless, the present version of Dolby Access frequently malfunctions. In this case, a clean reinstallation could be of assistance. To accomplish this, adhere to the guidelines described below:
- In the taskbar’s search box, type Dolby Access. Then, locate the same app in the search results and select Uninstall.
- Wait until Dolby Access has been successfully removed from your computer. After completion, you can visit the Microsoft Store to reinstall the most recent and compatible version.
ALSO SEE: Fix Spotify Something Went Wrong
Then, as you did previously, follow the on-screen directions to configure Dolby Atmos on your Windows 11 or Windows 10 computer. It should resolve the Dolby Atmos app not working Windows 10 issue for you.
Conclusion – Dolby Atmos Not Working on Windows 11, 10: FIXED
These are all the options you can take to resolve difficulties or technical errors that prohibit Dolby Atmos from working normally. After adopting the solutions above, we expect Dolby Atmos not working in Windows 11 and 10 to be rectified.
Please share your experiences in the comments section below. In addition, please indicate which solution worked for you in the box below.