The Epson printer won’t print anything when it goes offline. To print, the Epson printer must be online. Epson Printer may be offline for various reasons, including connection issues between the Epson Printer and PC, hardware/software issues, printer not set as default, outdated driver, deactivated spooler service, etc. This article will help you solve the issue that your printer isn’t printing because of. Here are some troubleshooting steps to assist in fixing Epson Printer going offline on windows and mac systems.
Guide On How To Fix Epson Printer Offline On Windows & Mac?
As described above, there are several causes for facing this issue. Follow the below steps to fix this issue and get your printer back online.
Uncheck Use Printer Offline (On Windows)
If your Epson printer constantly goes offline, uncheck the ‘Use Printer Offline’ option. The steps to do so are shown below.
1 – Check that your printer is powered and linked to your PC. Also, make sure your printer is network-capable.
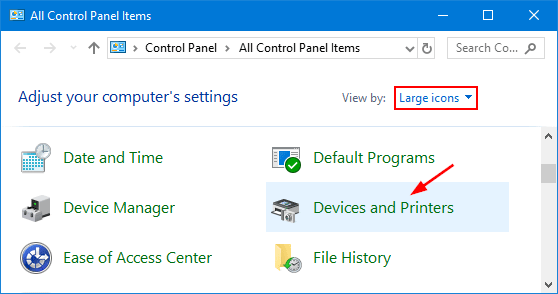
2 – Open the Start menu on your PC, then search for and open the Control Panel.
3 – Search for Devices and Printers and click the first option.
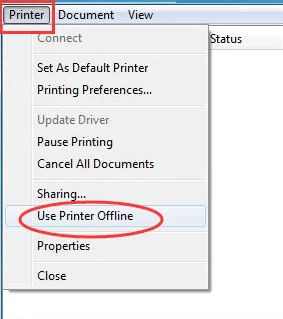
4 – Click See what’s printing and then right-click on your Epson printer in the list of printers.

5 – Click Printer and uncheck the Use Printer Offline option.
Set Epson Printer To Default (On Windows)
Setting the Epson Printer to default is another thing you must do. Again, you will likely face this issue if your printer is not set to default. Follow the steps listed below to set the Epson printer to default.
1 – Launch the Control Panel on your PC.
2 – Click Devices and Printers.
3 – Check the Set as default printer option by right-clicking on your Epson printer.

Ensure Print Spooler Service Is Running (On Windows)
Print Spooler manages the print queue on your PC. If the service is not running, that may be the source of the issue. Follow the steps below to check whether or not the Print Spooler service is running.
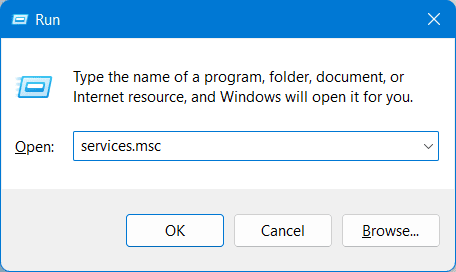
1 – To open the Services app window, press Windows + R, enter Services.msc, and then press Enter.
2 – Look for the Print Spooler service here. Check the service status and ensure it is set to Running.
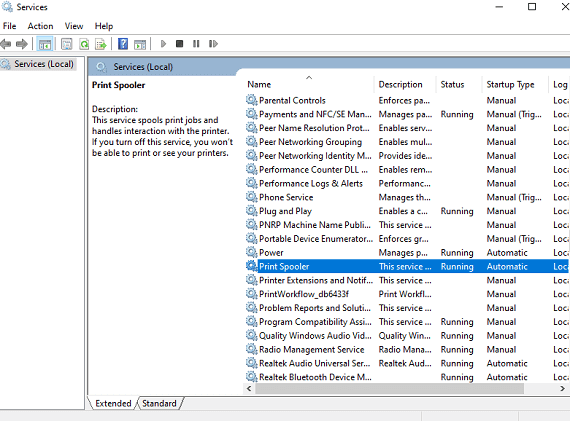
3 – If the service status isn’t set to running, right-click on the service, and click Start. The service will now begin.

Clear Printing Queue (On Windows)
Clearing the printing queue is another thing you need to do. Again, follow the steps outlined below to do this.
1 – Press the Windows key on the keyboard, search for Services, and open it.

2 – Search for Print Spooler under the Services section. Right-click it, then click Stop.

3 – To open File Explorer, press Windows + E.
4 – In the address box, copy and paste the address given below and press Enter.
%windir%\System32\spool\PRINTERS
5 – Select and delete all files and folders in the Printer folder.
6 – Right-click the Print Spooler service and click Start in the Services box.

Reinstall Printer (On Windows)
If you’re still facing this issue, then try reinstalling the printer. Reinstalling the printer should fix the issue which corrupted Printer drivers might cause. The steps to do so are shown below.
1 – Launch the Control Panel on your PC and click Add or remove programs.
2 – Click your Epson printer software, and next, click Uninstall. Confirm uninstalling the software.
3 – Go to the Devices and Printers section of the Control Panel. To remove your Epson printer, right-click it, click Remove Device, and follow the on-screen instructions.
4 – Click the Add Printer option once you’re done.
5 – Select the Add a network, wireless, or Bluetooth printer option.
6 – Follow the on-screen steps to add your printer to your PC.
Reset The Printing System (On Mac)
Try resetting the printing system on a Mac if you are using it to connect to your printer. To reset the printing system, follow the below steps.
1 – Click the Apple logo in the upper-right corner, then click System Preferences.

2 – Select the Printers & Scanners option.

3 – Click Reset Printing System after right-clicking your Epson Printer on the subsequent screen.

4 – You will be prompted to enter your login and password. After done, click OK.
5 – Hold off on displaying the printer list. Instead, click the Plus button to select your Epson printer.

6 – This will add the printer, and you can now print.
Remove Other Printers On Mac
This issue could be caused by other printers connected to your PC. However, if you continue to face the issue, try removing other printers from your Mac. Follow the steps outlined below to do this.
1 – Select System Preferences from the Apple Menu.
2 – Select the Printers & Scanners option.
3 – Choose a printer other than the Epson printer from the list and click the – icon to delete it.

4 – Except for the Epson printer, perform this procedure for all other printers on your Mac.
5 – Select your Epson Printer from the drop-down box next to Default Printer.
Conclusion:
Here is how to fix an Epson Printer going offline. Issues with drivers or connections may cause this issue. However, you can solve the issue you’ve been facing by following the steps above.