
What does the error message “No Internet Secured” mean? Have you ever seen this error? This error prevents you from using the Internet connection. Your gadget connects to Wi-Fi, but Internet access is unavailable. When this error happens, a yellow triangle will appear on the screen’s Wi-Fi or Ethernet icon in the lower right corner. The ‘No internet secured’ error happens more frequently in Windows 10 than in prior versions. This error may occur even if you are connected to the Internet through a router. Several causes for this error include modifications to IP configuration settings or the requirement to update or install new software. Even if Windows has been updated, you may encounter this issue. However, there is no need for concern as this can be readily resolved using the following methods.
How To Fix “No Internet Secured” Error?
Windows 10 offers a variety of solutions for the “No Internet Secured” error. Below are a few methods that may solve you in resolving this issue.
Refresh IP Configuration
There are a few commands that may solve you in resolving the error.
1 – Right-click the Start menu and select the Windows PowerShell option.
2 – Now, enter the following two commands:
ipconfig /release
ipconfig /renew
3 – After entering the commands, your computer will be instructed to obtain a new IP address from the router.
Change Properties Of Your PC Connection
You may modify the properties of your PC’s Wi-Fi connection by carrying out the following steps:
1 – Press the Windows Key + R key combination to launch the run dialogue box. Enter ncpa.cpl followed by enter.
2 – The “Network Connections” window will now be shown.
3 – Select the Wi-Fi connection and then right-click it. Select “Properties”

4 – Ensure that you now select the choices listed below:
Client for Microsoft networks

File and printer sharing for Microsoft networks

Link-layer topology discovery mapper I/O driver

Internet protocol version 4, or TCP/IPv4

Internet protocol version 6, or TCP/IPv6

Link-layer topology discovery responder
5 – Click the network icon and locate the network generating the error.
6 – Unplug the Ethernet wire from the computer. Turn the Airplane mode on your computer.
7 – Restart the wireless router. Turn off Airplane mode once the router is On
8 – Connect Wi-Fi to your computer once more and verify that everything is working properly.
Update Network Device Driver
If you see the “No Internet Secured” error message, your Network Device Driver may be at fault. Therefore, please update it to fix the issue.
1 – Right-click the Start Menu icon.
2 – Click Device Manager
3 – In the list, locate Network Adapters and select your network device.
4 – Right-click on it and click the Update driver option.
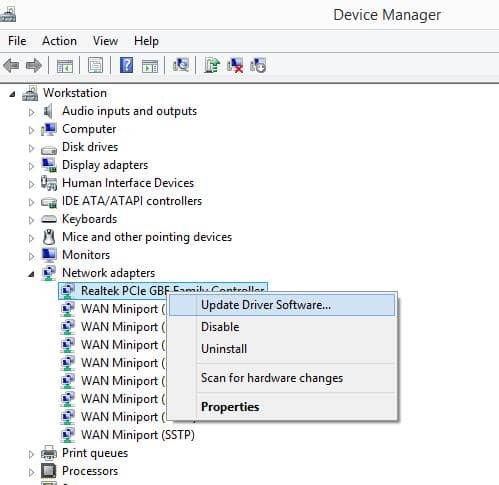
5 – Reboot Windows while the driver is being updated.
6 – Upon completion, Windows will join automatically to the network.
7 – If this isn’t working, click Disable Device instead of selecting Update driver, restart the computer, and then reactivate the device.
Disable Wi-Fi Sharing Software
In Windows 10, the router driver may be incompatible with the wireless driver. To fix this issue easily, follow the steps below:
1 – Press Windows Key + R, type ncpa.cpl, and then press Enter.
2 – Look for Network Adapters here. Perform a right-click on the network you are using.
3 – Choose “Properties” and then click “Sharing.”
4 – Uncheck the “Microsoft network adapter multiplexor protocol” option and any other Wi-Fi sharing-related choices.

5 – Click on each item and read its description to see which ones pertain to sharing.
6 – Now, attempt a connection to the Internet.
Reset Winsock
There is a possibility of encountering issues with the Windows Sockets API. You can reset Winsock to solve the Windows 10 “No Internet Secured” error.
1 – In the search bar, enter Command Prompt.
2 – Right-click it and select Run as administrator.
3 – Allow permission by selecting yes.
4 – Enter the specified command to reset the Winsock configuration.
netsh winsock reset catalog
5 – Wait a bit and manually rejoin the network, or it may reconnect automatically.
Conclusion:
We have done our best to explain how to fix the “No Internet Secured” error. With any luck, these remedies will fix your problem.