Detailed instructions on resolving Teardown Keeps Crashing on Windows 11, 10, or older versions. However, after reading the article, you can resolve the issue independently.
Teardown, created and distributed by Tuxedo Labs, is the best sandbox, action, and puzzle game. Teardown is an interactive and destructible environment in which player autonomy and emergent gameplay are the driving mechanics. However, the consistent crashing inhibits you from enjoying the destructible voxel world. Numerous players have recently noted that Teardown keeps crashing or lagging on Windows. The issue has been encountered in various forms and configurations.
According to some users, Teardown crashes or freezes in the middle of gameplay, while others claim that the game begins to freeze upon launch. It isn’t very pleasant, but it can be resolved quickly. There are a few straightforward ways to resolve Teardown Keeps Crashing issue. In this post, we will demonstrate several efficient alternatives that will undoubtedly assist you in regaining your footing.
Before We Begin In the first step, you should always verify that your computer meets the game’s minimum system requirements. If not, you must upgrade your system or play the game on a different one. The minimal and recommended system requirements for Teardown are listed below.
Minimum Requirements:
- OS: Windows 7
- Memory: 4 GB RAM
- Processor: Quad Core CPU
- Storage: 4 GB available space
- Graphics: NVIDIA GeForce GTX 1060 or higher
Recommended Requirements:
- OS: Windows 11 or 10
- Memory: 4 GB RAM
- Storage: 4 GB available space
- Processor: Intel Core i7 or higher
- Graphics: NVIDIA GeForce GTX 1080 or better
Note: As per the official guide of Teardown, the game can’t run on Intel empowered graphics card.
[lwptoc]Quick Solutions to Fix Teardown Keeps Crashing on Windows 11, 10, 8, 7
Here are a handful of the most viable answers to your problem to fix Teardown keeps crashing on Windows PC. However, it is not necessary to apply them all. Instead, proceed through each option and select the one that works best for you. Now, without further delay, let’s begin:
Solution 1: Restart your Computer
As simple as it may seem, you should always restart your PC whenever you experience a game crashing, freezing, or lagging. Because sometimes, when a problem or bug is transient, a clean restart can resolve the issue. If not, consider one of the advanced alternatives detailed below.
Solution 2: Stop Overclocking
Most gamers overclock their CPU or GPU to boost overall game performance. Nevertheless, overclocking will likely make your system unstable and cause your game to stutter or crash. If this is the case, it is recommended that you disable any overclocking software (such as MSI Afterburner) and reset the clock speed to the default.
After completing these steps, relaunch the game and determine whether the Teardown crashing on PC fixed or not. If the game crashing problem persists, more workarounds are available.
Solution 3: End Background Running Apps or Processes
Close any extra apps or processes operating in the background and use the system resources your game (Teardown) should be using. To resolve the issue, please do the following steps:
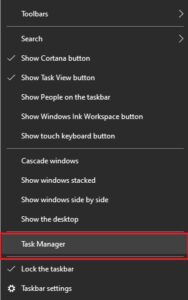
- First, right-tap on your taskbar and choose Task Manager.
- You’ll need to locate the processes you no longer need in the Task Manager window.
- Tap right on them one by one and select End Task.
After closing the unwanted apps, now try to re-open Teardown, then check if it starts working fine now or not.
Solution 4: Allow Teardown via Control Folder Access
Ensure that the game has complete access to all essential data and files as a second method for resolving Teardown keeps crashing on Windows 11, 10 PC. You can add the app to the list of permitted apps in Controlled Folder Access. How it works:
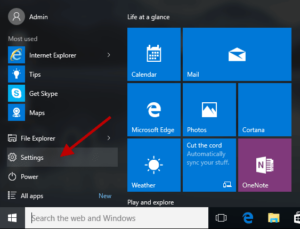
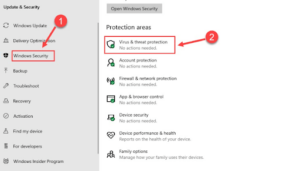
- Tap on the Start button and click on Settings.
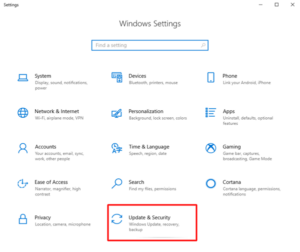
- Then, tap on Update & Security.
- Next, on the left pane, choose Windows Security and then tap on Virus & threat protection on the right.
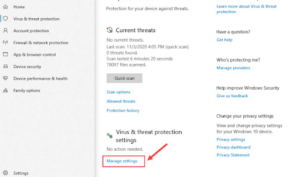
- Afterward, click on Manage Settings.
- Next, scroll down until you see Manage Controlled Folder Access and tap on the same.
- If Controlled folder access is enabled, select Allow an app through Controlled folder access.
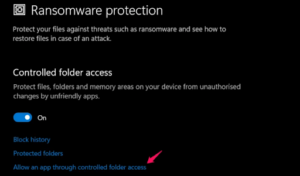
- Select Browse all apps after clicking Add an official app. Select Teardown as a trustworthy or reputable program.
Upon completion, relaunch the game to verify its functionality. If Teardown keeps crashing, consider a different approach to resolve the issue.
Solution 5: Disable Antivirus Temporarily
Antivirus software is unquestionably designed to avoid potential security threats on a computer system, but sometimes it gets overprotective and interferes with games or related files. Try opening Teardown again after briefly removing your antivirus software to determine whether this is the issue.
Add Teardown to the exclusion list of your antivirus software if the game is functioning properly so that you can use both programs without interference. If this doesn’t fool you, move on to alternative solutions to resolve the Teardown Crashing, Freezing, Not Launching issue.
Solution 6: Update your Graphics Drivers
Problems such as game crashing, freezing, and lagging are commonly caused by missing or old graphics card drivers. GPU drivers are crucial to game performance. Updating the graphics drivers can correct errors, improve stability, and increase the gaming experience.
You can obtain the correct driver for your graphics card in one of two ways: manually or automatically.
Way 1: Manually Update Graphics Card Driver from Manufacturer’s Site
To use this workaround, you must first determine whether your GPU is AMD, NVIDIA, or something else. Then, you can visit the manufacturer’s official support page and search for the appropriate driver file based on your Windows version. Later, manually download the driver installer. When the download is complete, double-tap the downloaded driver file and follow the on-screen instructions to complete the installation.
Remember that manually updating drivers involves specialized computer skills and considerable time and effort. Therefore, if you are inexperienced and need help comprehending technical matters, we recommend that you update your drivers automatically using a reputable third-party app such as Bit Driver Updater. To know more about this strategy, continue reading!
Way 2: Automatically Update Graphics Driver through Bit Driver Updater (Recommended)
Bit Driver Updater is one of the quickest and most efficient ways to obtain the correct driver updates. By automating every necessary process, the tool makes things much simpler and faster. In addition, it detects the unique flavor of your Windows version and then selects the best drivers for it.
In addition, the utility removes system debris from system corners and speeds up the computer. There are two versions of the driver updater: the free version and the paid version. Both editions function incredibly well; however, the pro version allows you to update all PC drivers with a single mouse click. While the free version is partially manual, drivers must be updated individually. The following are additional advantages of using Bit Driver Updater’s professional version:
- Lets you schedule driver scans.
- 24*7 technical assistance.
- Full money-back guarantee but for a specific period.
- Auto backup or restore wizard.
Now, take a look at the instructions below to learn how Bit Driver Updater works:
- From the button below, download Bit Driver Updater.
- Run the downloaded file & execute the on-screen instructions to finish the installation process.
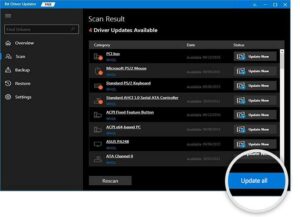
- Upon completion, start the Bit Driver Updater and select the Scan option from the menu on the left.
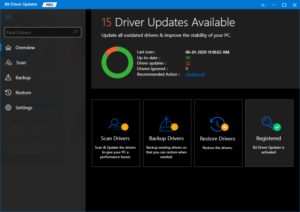
- Wait while the driver updater scans your system for outdated or broken drivers.
- Examine the scan results and click the Update Now option next to the faulty graphics driver. Alternatively, you may select the Update All button to update additional drivers concurrently.
To apply new drivers:
- Restart your PC.
- Check to see if Teardown keeps crashing after resolution.
- If not, proceed to the next option.
Solution 7: Verify Integrity of Game Files
Damaged, corrupt, or missing game files are the most prevalent cause of PC game crashing issues. If so, you should attempt to validate the integrity of your installed game files. It may help you fix the issue where Teardown keeps crashing in Windows. Observe the steps listed below:
- Launch Steam and tap LIBRARY to proceed.

- Find and right-tap on Teardown.
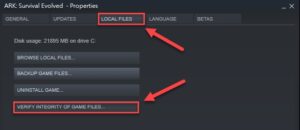
- Then, choose Properties.

- Switch to the LOCAL FILES tab and tap on VERIFY INTEGRITY OF GAME FILES.
Relax and wait for the Steam client to locate and repair the corrupted or damaged game files. Upon completion, relaunch the game and see if Teardown stops crashing. If that does not work, proceed to the final option.
Solution 8: Reinstall the Game
None of the other solutions worked to solve the Teardown Crashing at Startup and Won’t Launch? Uninstalling and reinstalling the game should be your final option. There may be some persistent issues with your previous installation. Here is how to proceed;
ALSO SEE: Fix Titanfall 2 Origin Overlay Not Working
- Open Steam, then go to the LIBRARY tab.

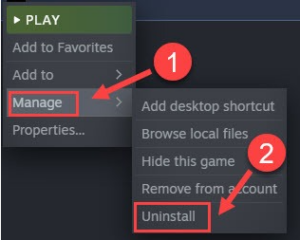
- Look for Teardown on the available game list and tap right on the very same.
- Next, tap on Manage.
- To affirm your action, click on Uninstall.
After completing the above procedures, restart your computer, redownload, and reinstall the game. Installing the latest version will help you fix Teardown keeps crashing on Windows.
Teardown Keeps Crashing on Windows: FIXED
We hope one of the following solutions will assist you in resolving Teardown crashing or lagging issues on Windows 11, 10, 8, or 7 PCs. If you have any queries or recommendations for improvement, please comment below.